Quick Start
Sign up at sidney.cz, pick a widget mode, and set your brand color and button label in the dashboard.
Go to Dashboard → Install. Select your platform, copy the one-line script tag shown there.
</body> and verify
Add the snippet to your store's HTML. Use the built-in connection checker in the Install tab to confirm it's live.
<script
  src="https://www.sidney.cz/widget.js"
  data-site="YOUR_SITE_ID"
></script>
Your Site ID is shown in Dashboard → Install after you sign in.
Installation
Choose your platform below. The snippet is identical — only where you paste it differs.
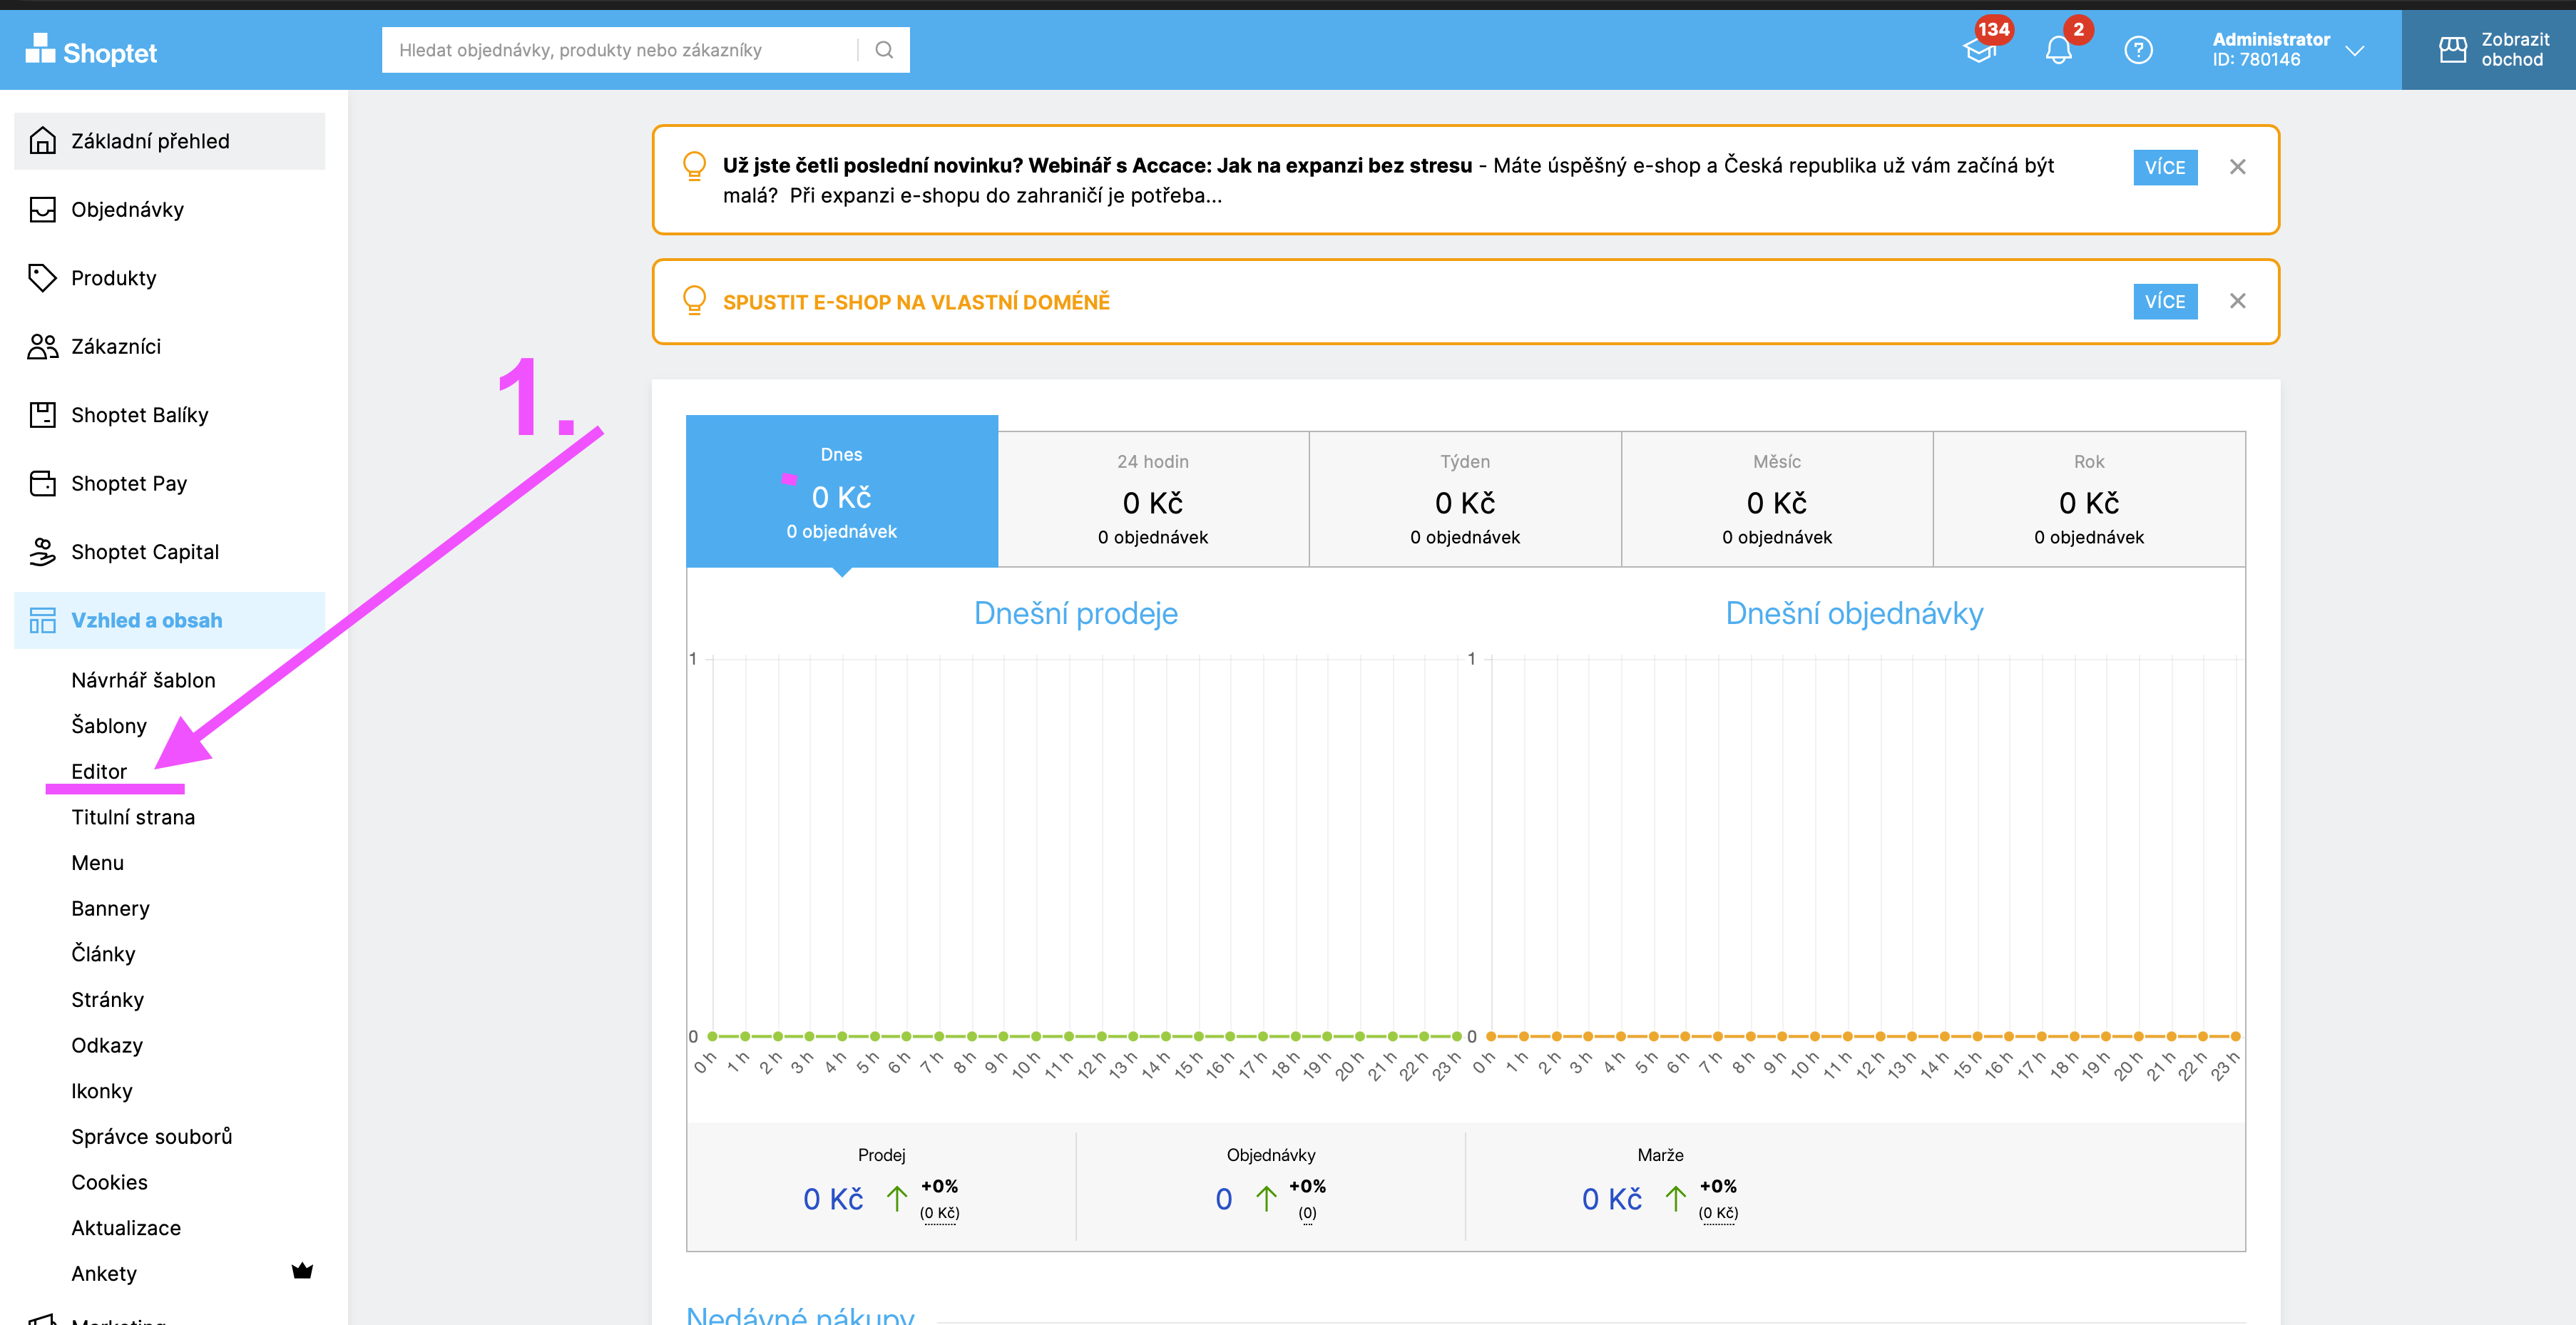
- Log in to your Shoptet admin. In the left menu go to Vzhled a obsah → Editor.
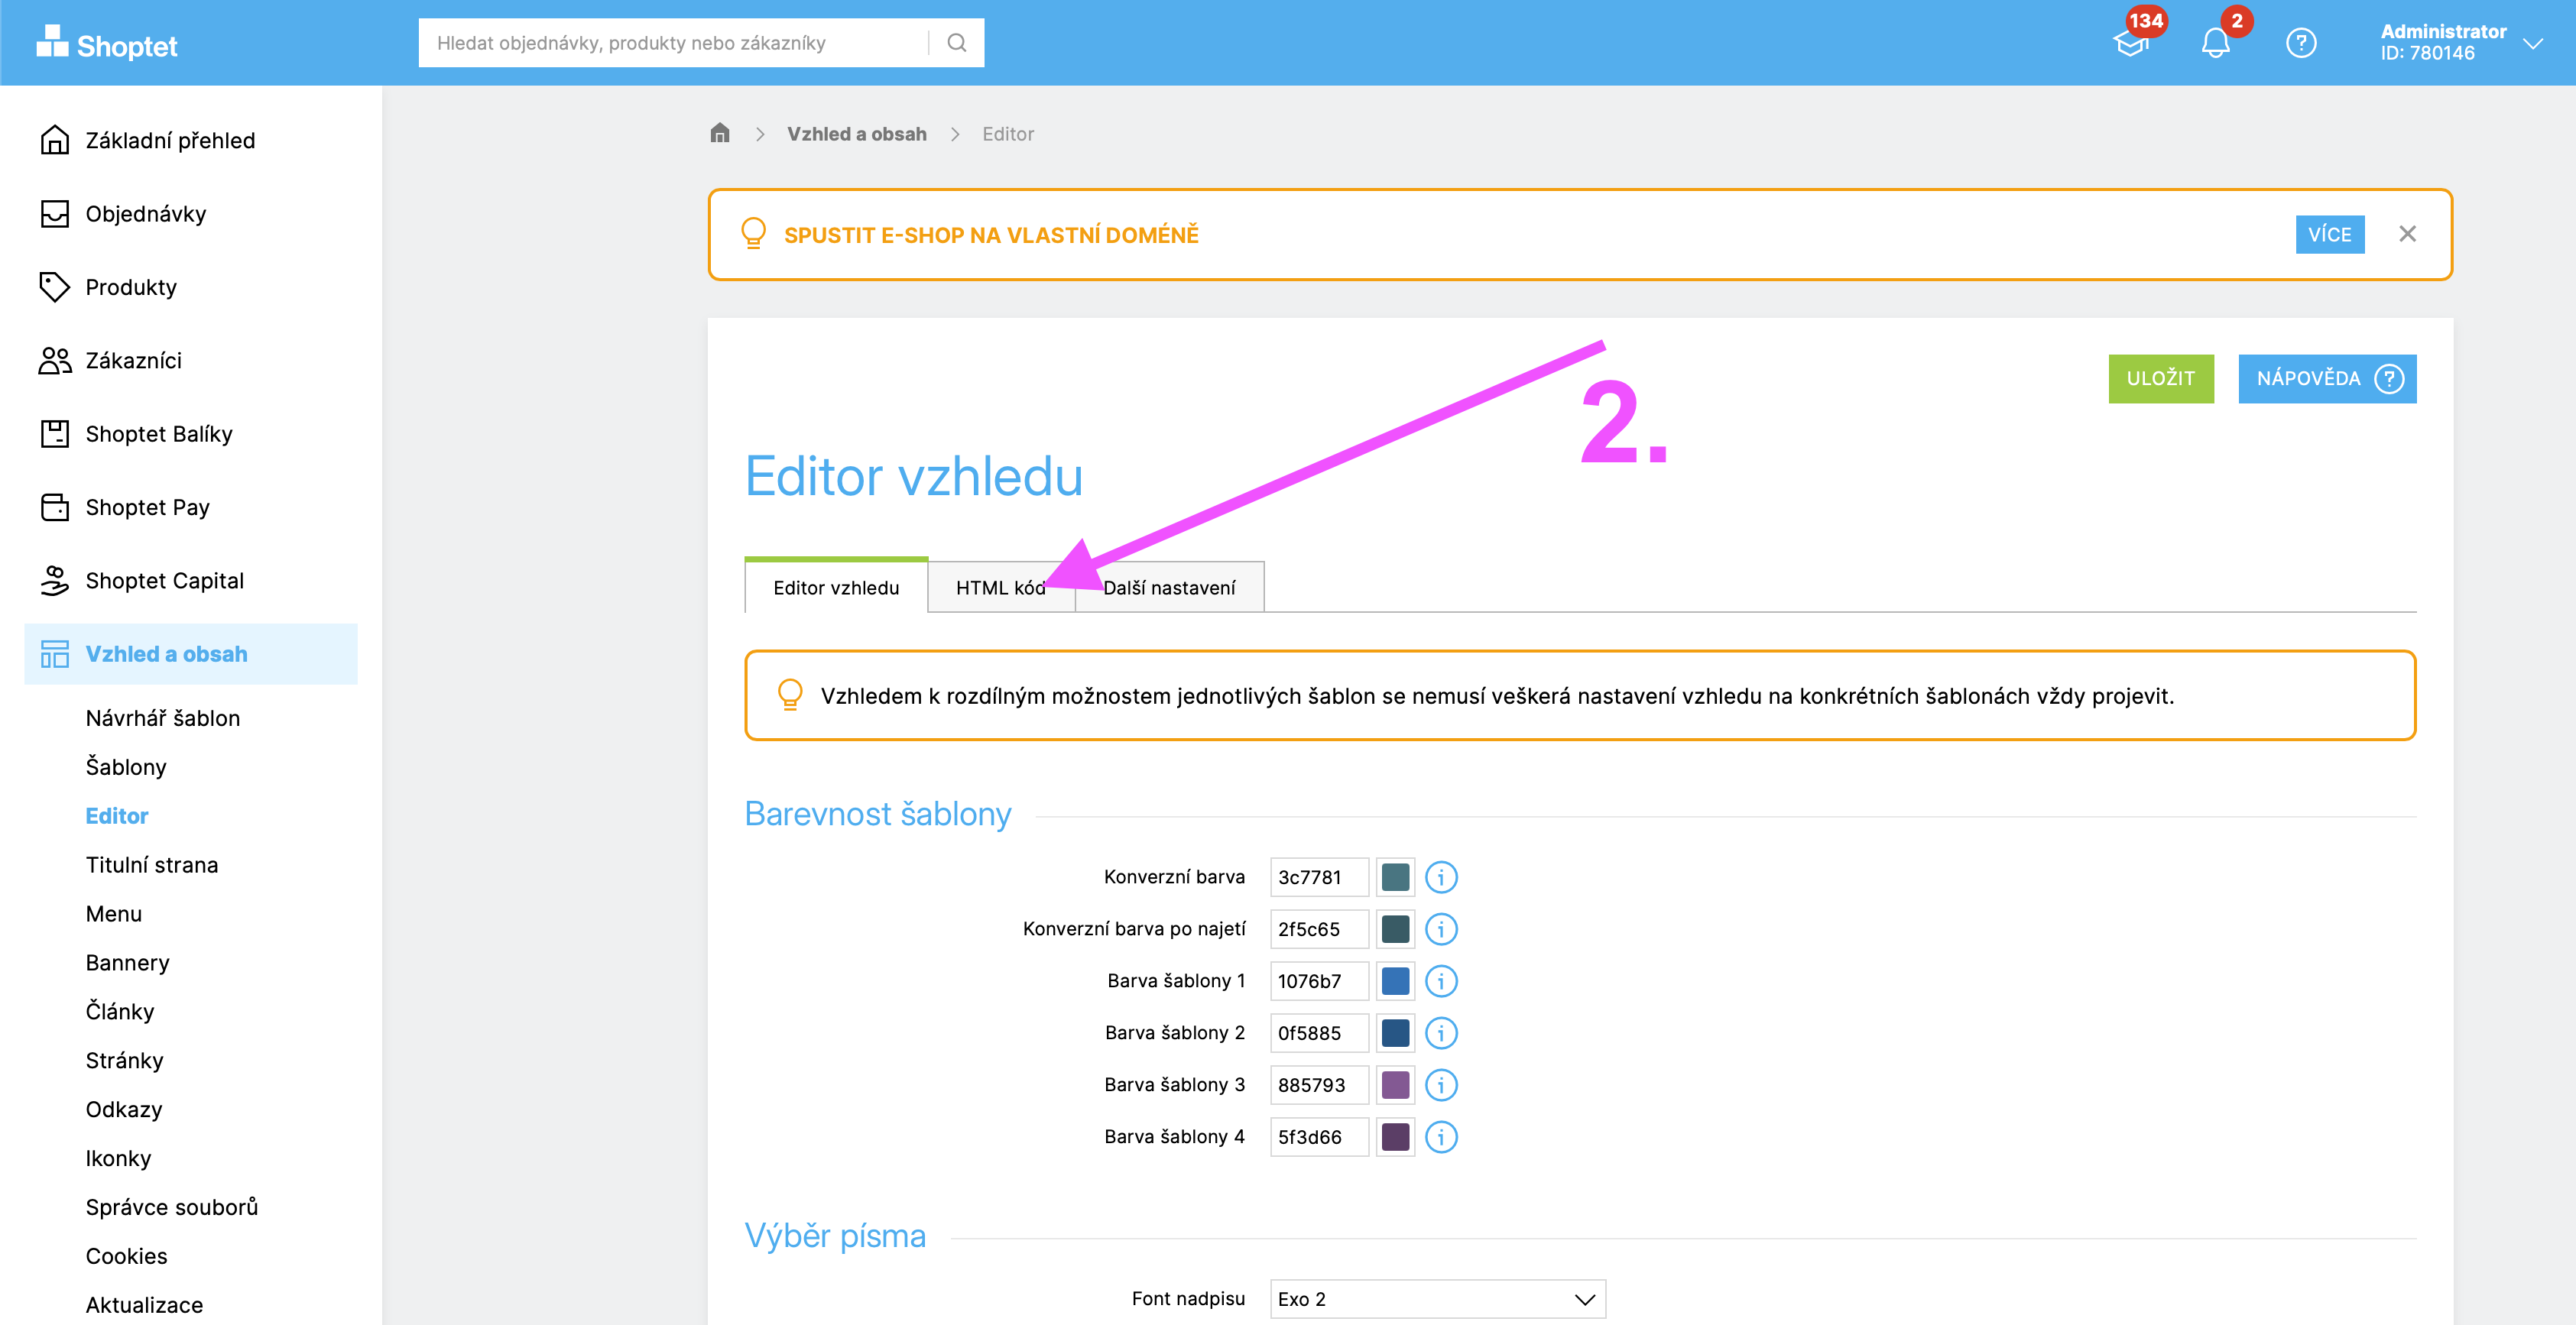
- Click the HTML kód tab at the top of the editor.
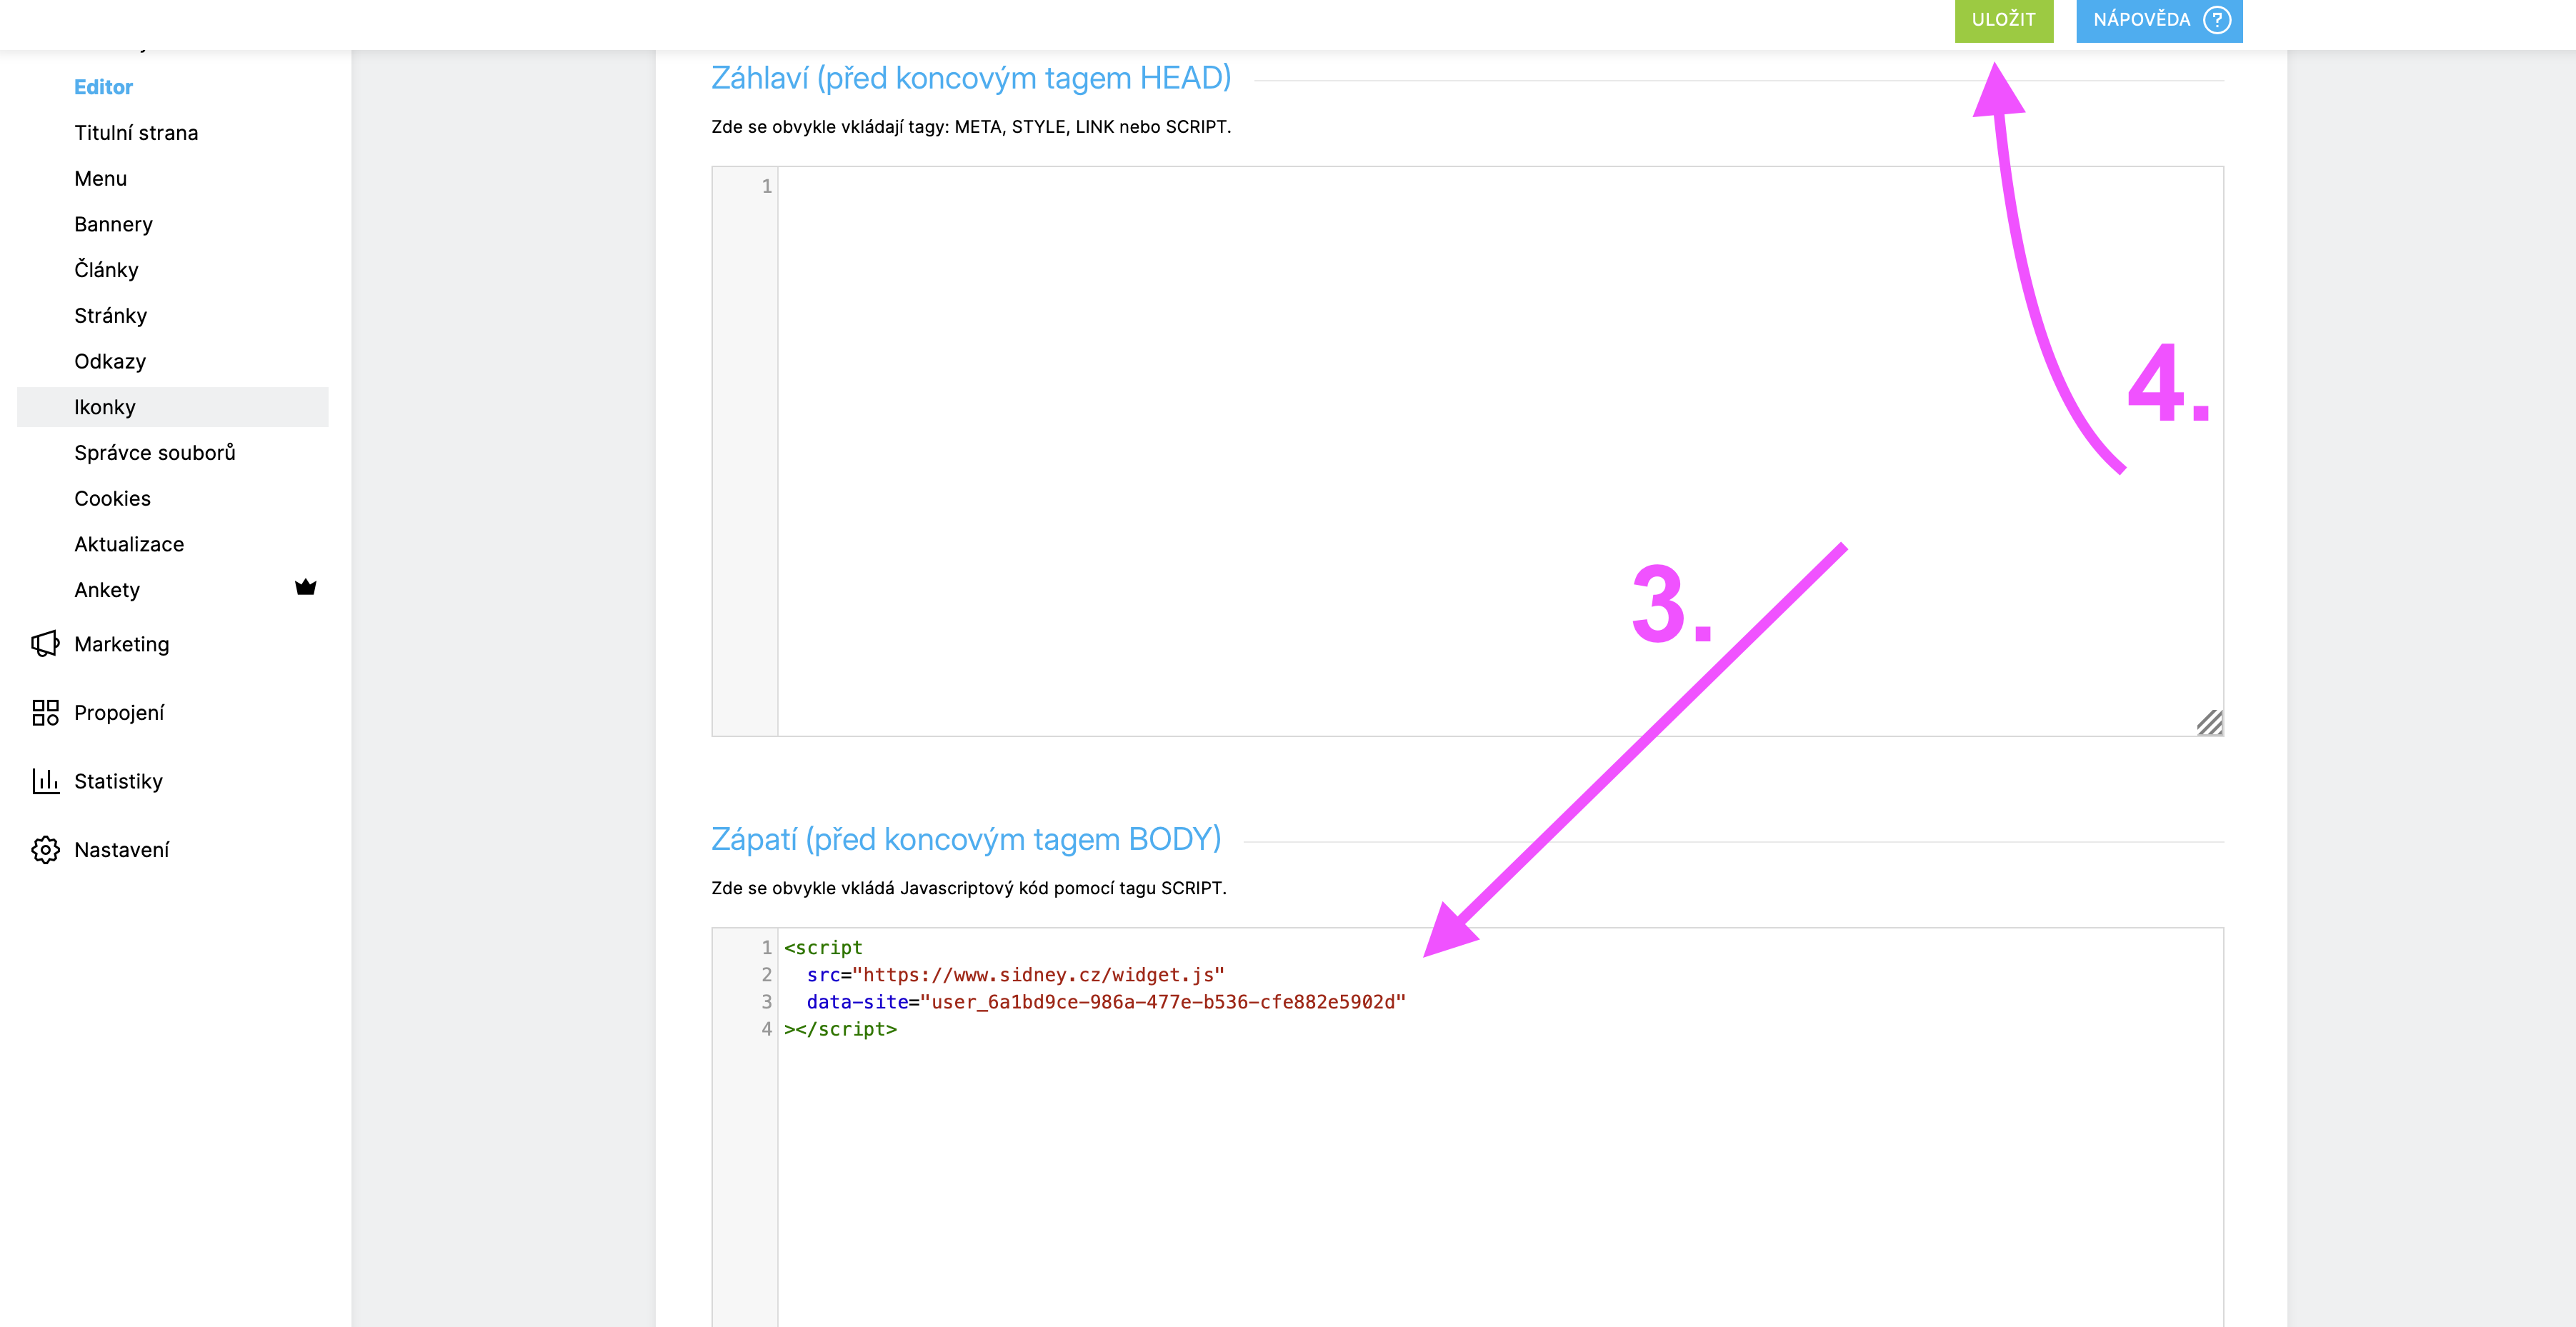
- Scroll to the Zápatí (před koncovým tagem BODY) section and paste your Sidney snippet there.
- Click Uložit in the top-right corner to save.
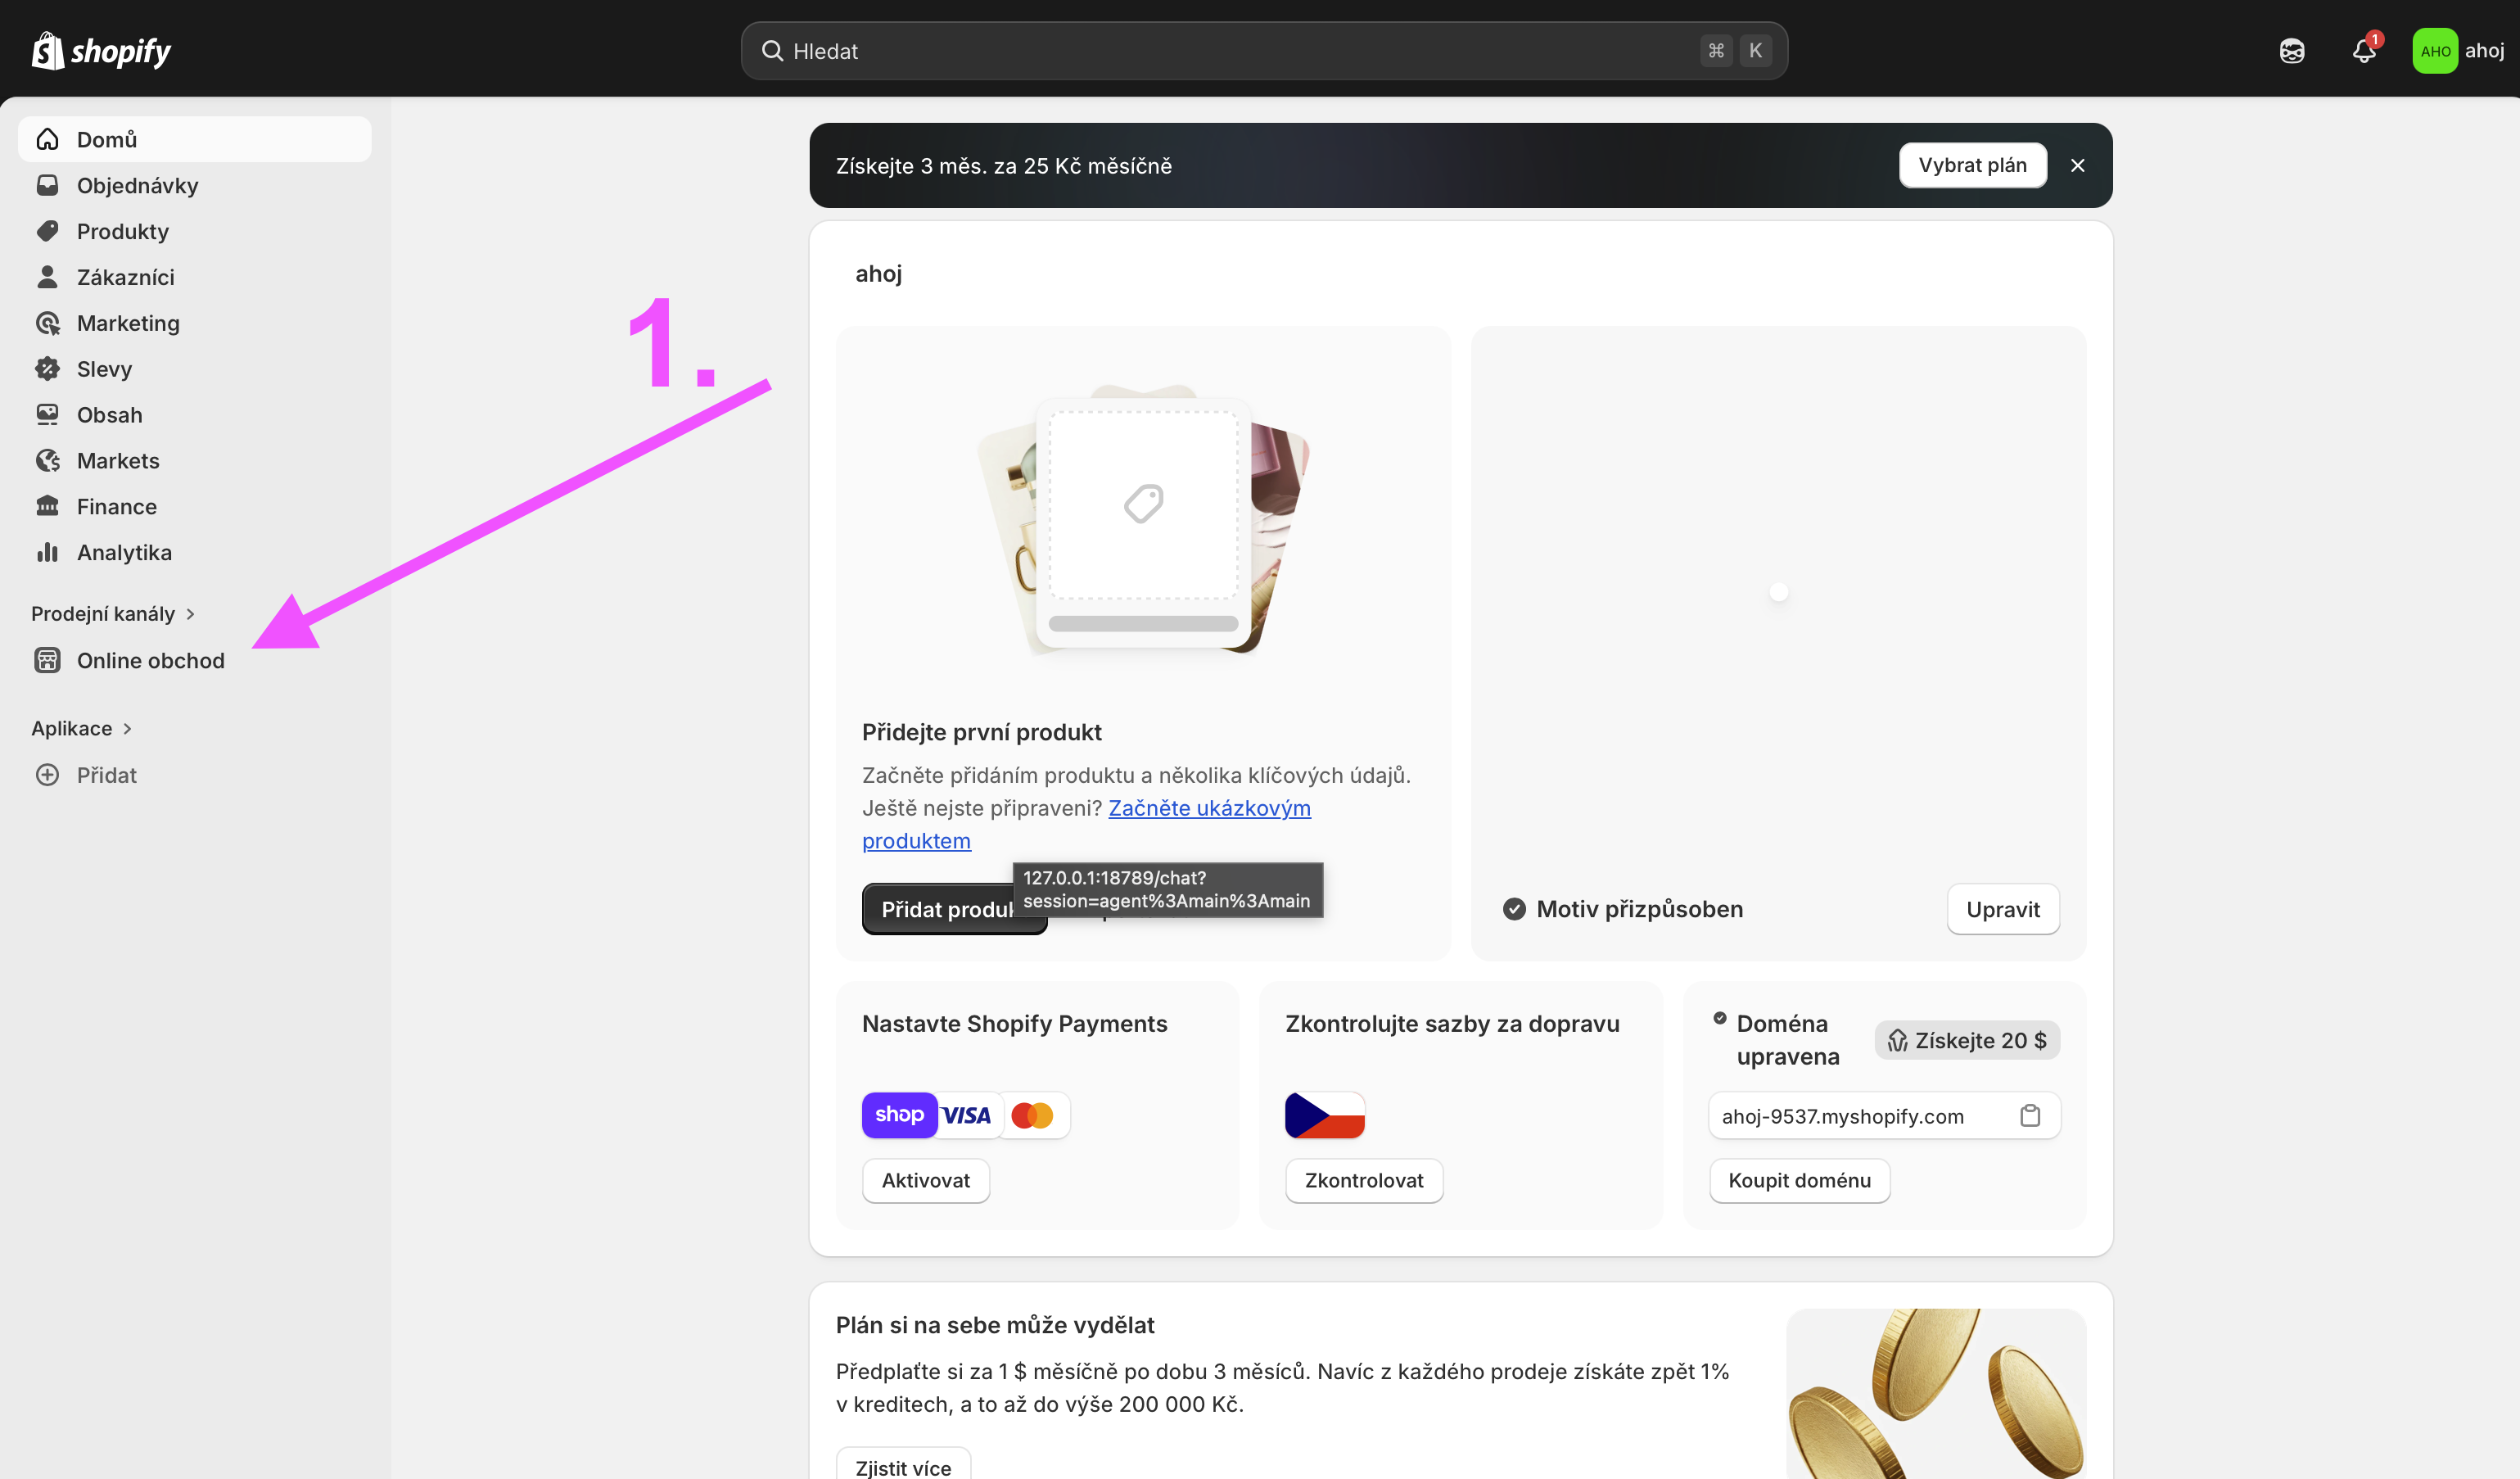
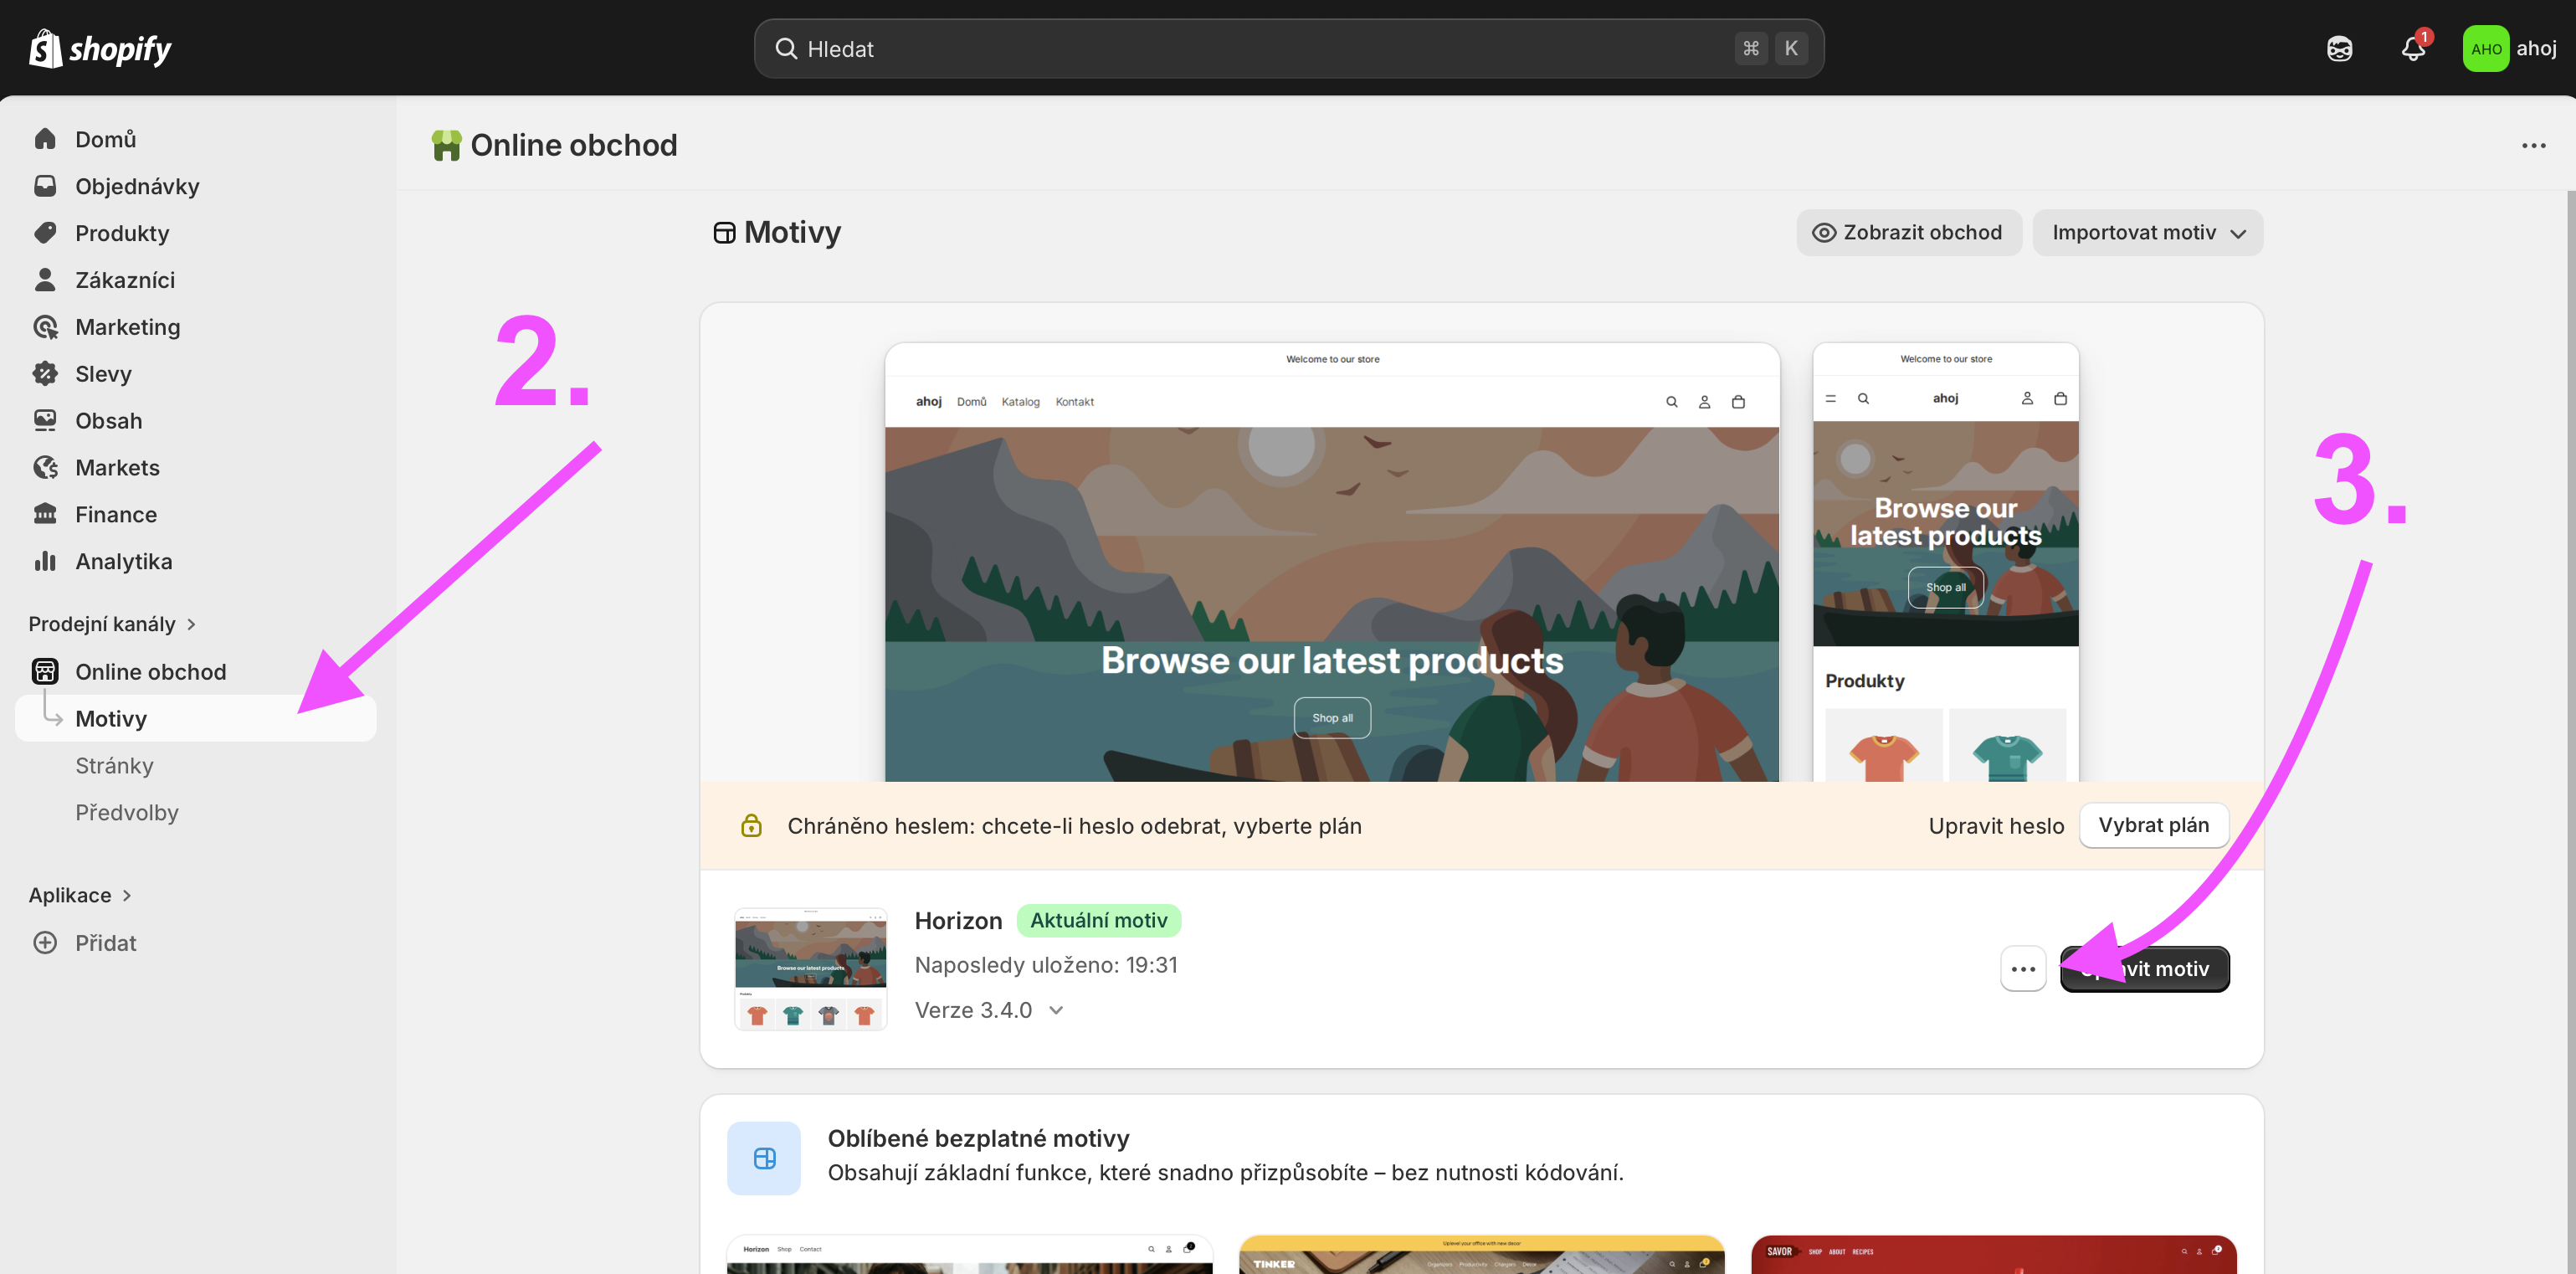
- Log in to your Shopify admin at admin.shopify.com.
- Go to Online Store.
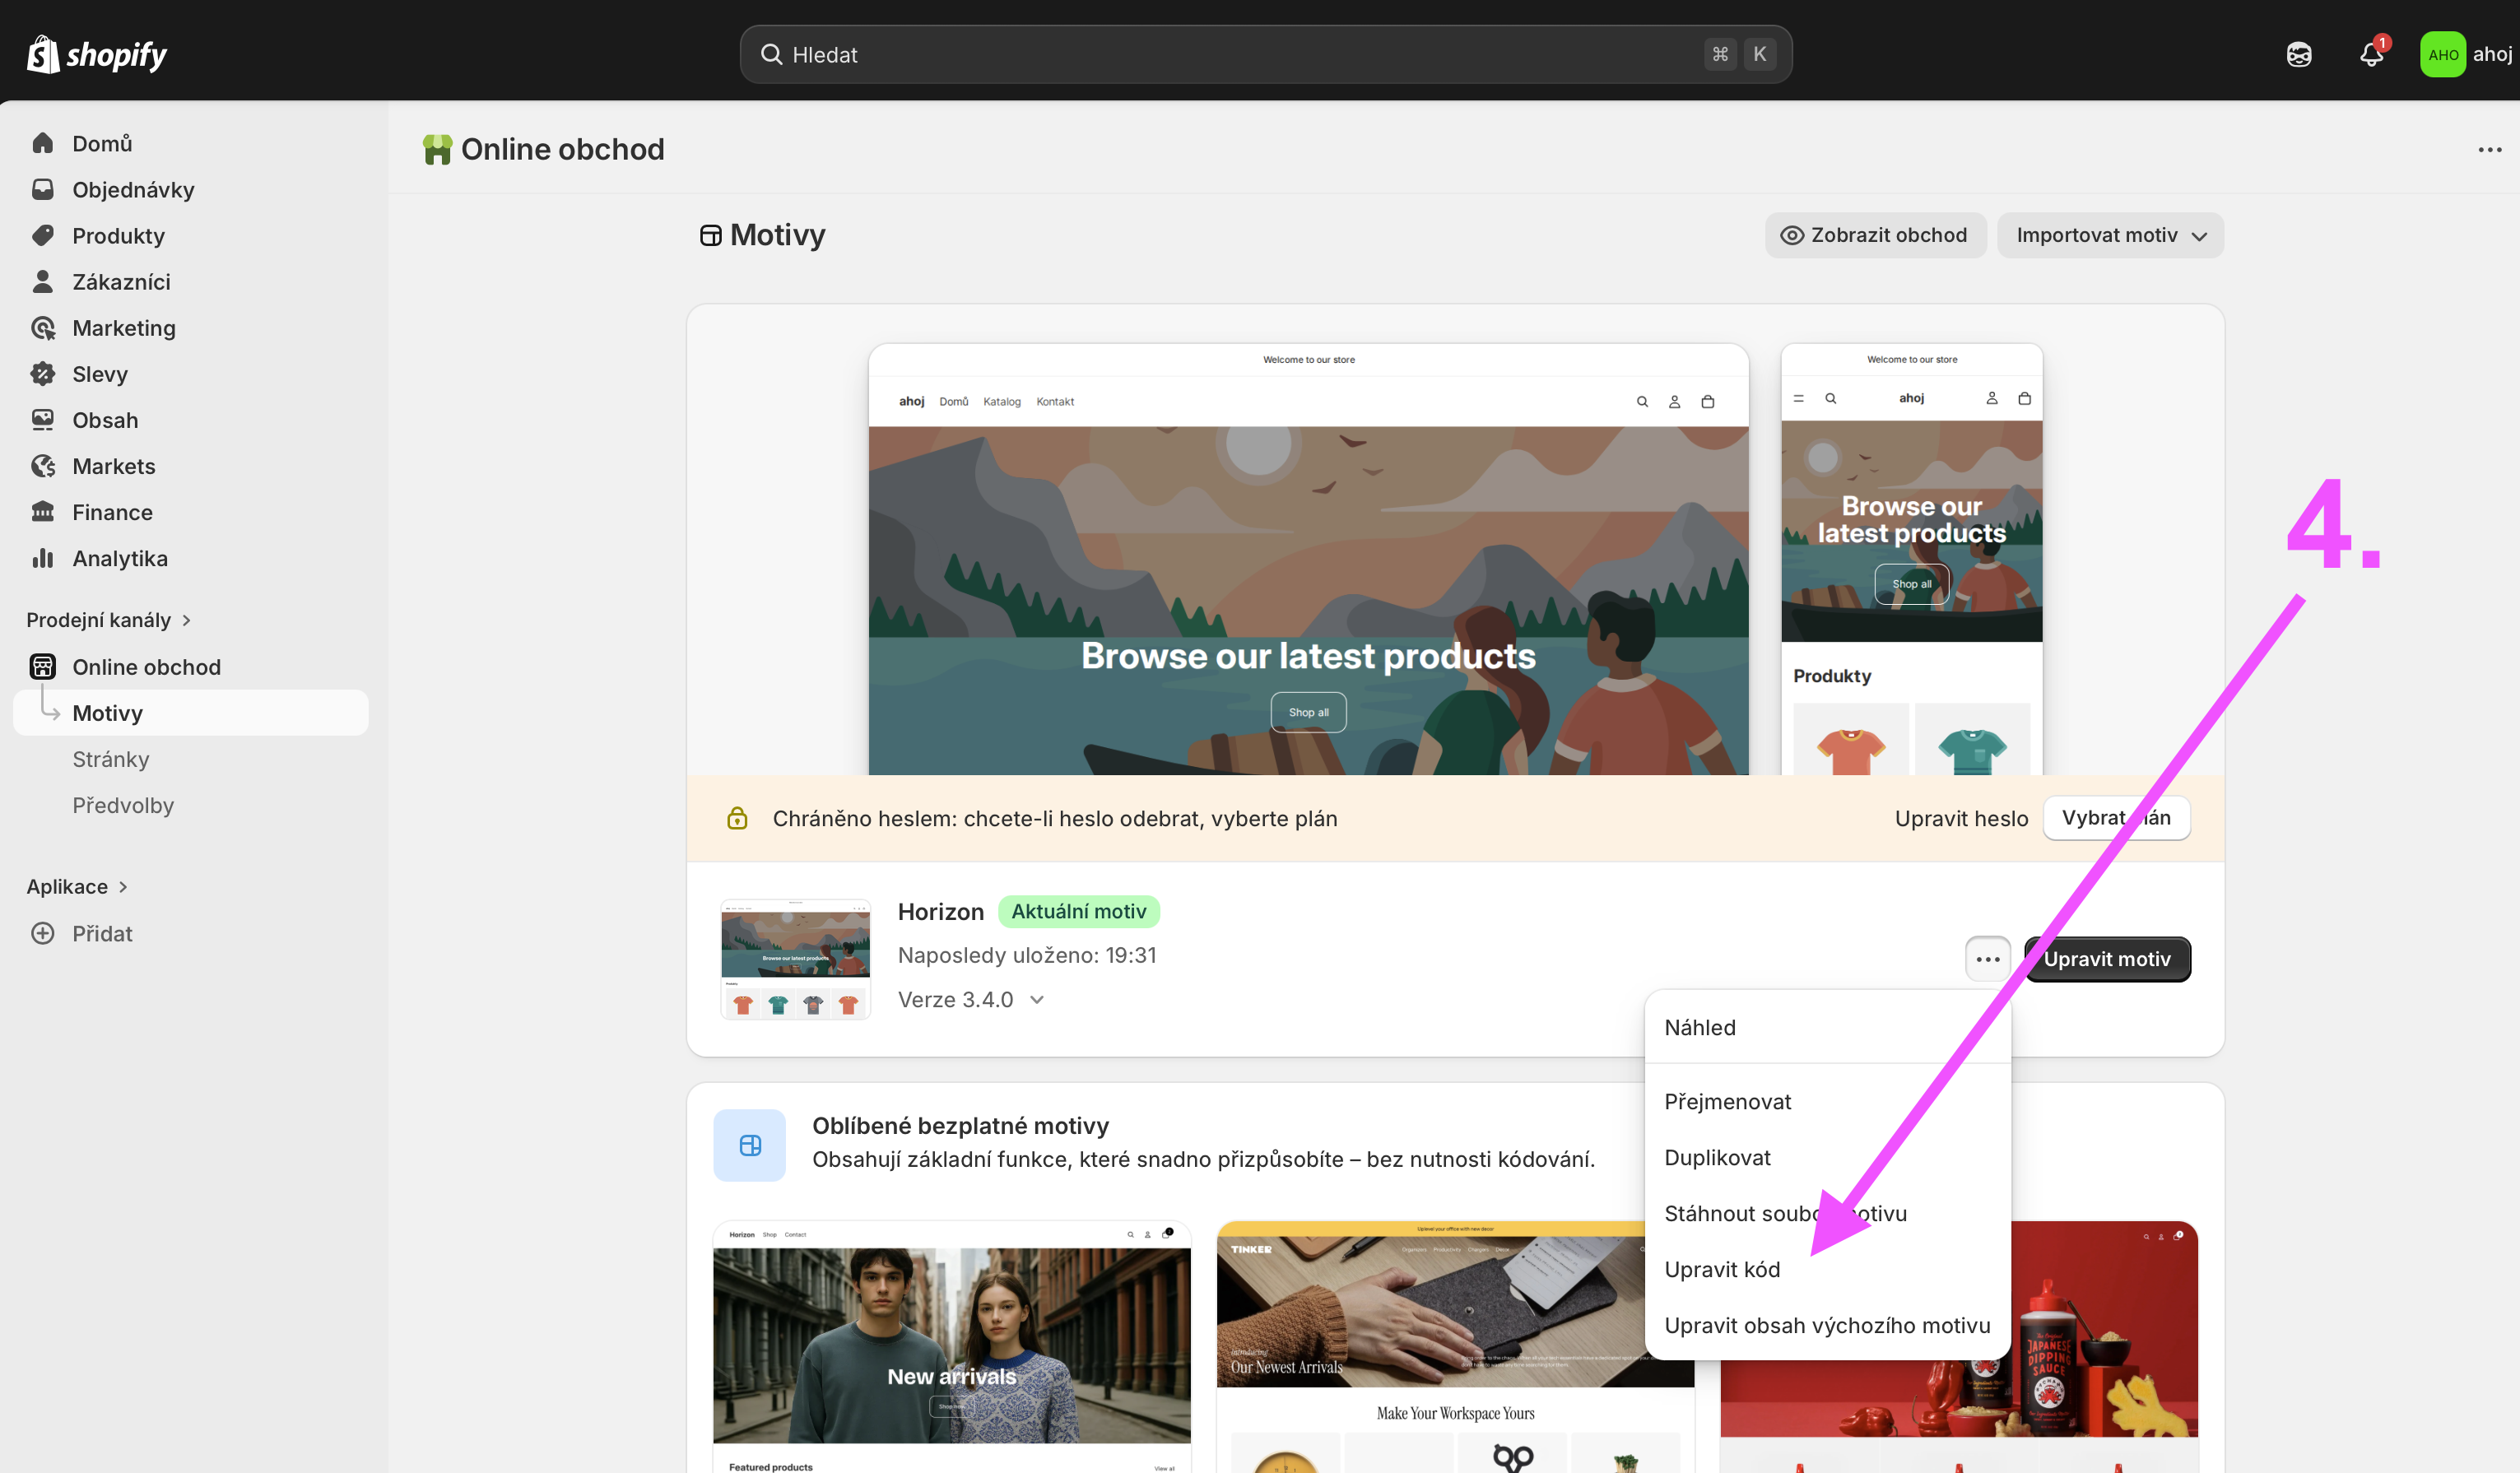
- Click the three dots next to your active theme → Edit theme → Edit code.
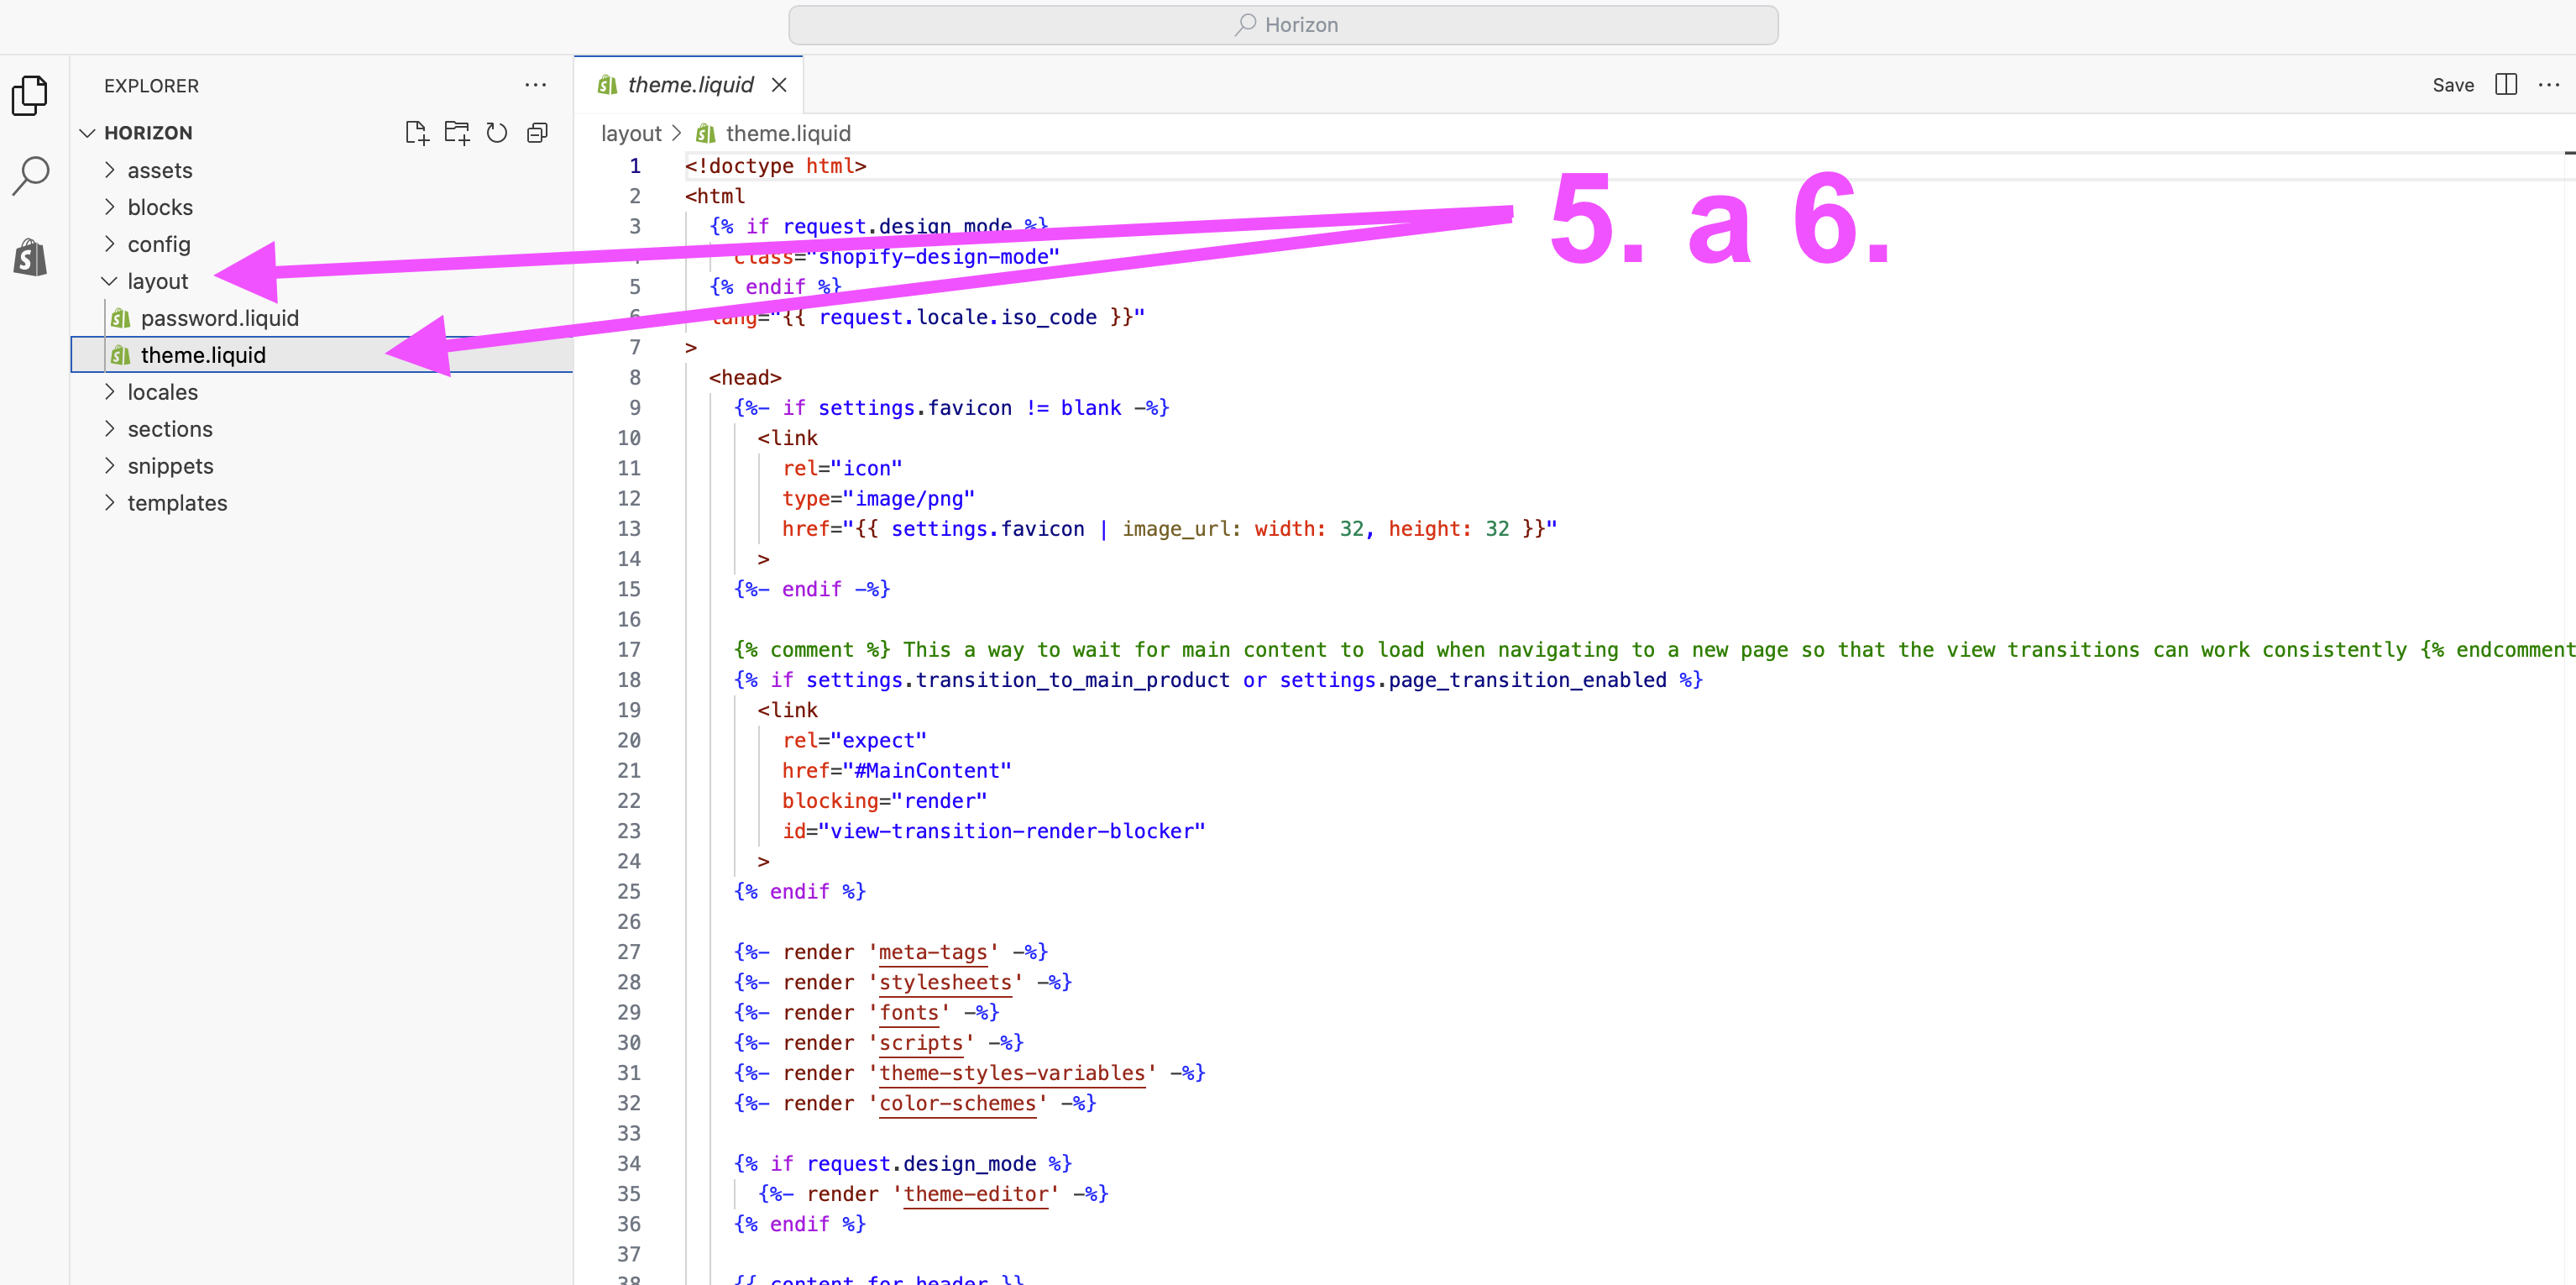
- In the file list open Layout / theme.liquid.
- Find the closing
</body>tag and paste the snippet just before it. - Click Save in the top-right corner.

- Log in to your WordPress admin.
- Install the "Insert Headers and Footers" plugin (or similar).
- Go to Settings → Insert Headers and Footers.
- Paste the snippet in the Scripts in Footer field and click Save.
- Open your website's main HTML template in a code editor.
- Find the closing
</body>tag. - Paste the snippet just before it.
- Save and deploy your changes.
Configuration
The widget is configured via data-* attributes on the script tag. Most settings are managed from the dashboard — the attributes below are optional overrides.
| Attribute | Description | Default |
|---|---|---|
| data-siterequired | Your unique site ID. Found in Dashboard → Install. | — |
| data-color | Primary color of the widget button and accents. Hex value. | #224f68 |
| data-buttonLabel | Label shown on the feedback button. | Feedback |
| data-lang | Force a specific language. Accepts: en, cs, sk. Defaults to browser language detection. |
auto |
| data-debug | Set to "true" to enable console logging for troubleshooting. |
false |
<!-- Full example with optional overrides -->
<script
  src="https://www.sidney.cz/widget.js"
  data-site="YOUR_SITE_ID"
  data-color="#e63946"
  data-buttonLabel="Give feedback"
  data-lang="en"
></script>
Color, button label, position, and widget texts can all be set from the Dashboard → Widget tab without touching the script tag. The data-* attributes override whatever is set in the dashboard.
Widget Modes
Sidney supports three modes. You switch between them in Dashboard → Widget — your embed code never changes.
Customers submit ideas and vote for the ones they want most. You manage statuses: Under Review, Planned, In Progress, Done.
Ask one focused question and watch real-time votes roll in. Perfect for validating a feature before building it.
Collect free-text answers when checkboxes aren't enough. Read what customers say in their own words.
Switching modes on a live widget (when it's already enabled and collecting responses) requires Starter or higher. On the Free plan you can switch modes only while the widget is disabled.
Dashboard Overview
Overview
Your main stats at a glance — responses this month, active domains, and current plan usage.
Widget
Set the widget mode (Ideas / Poll / Opinion), toggle it on or off, pick a position, customize colors and button label. Changes apply instantly — no redeploy needed.
Ideas / Poll / Opinion
View and manage all collected responses for the active mode. Moderate ideas, update statuses, archive old polls, and read open-text answers.
Roadmap
Public-facing view of your ideas board. Shows customers what's Under Review, Planned, In Progress, and Done. Shareable via a direct URL.
History
Past polls and opinion responses that have been archived. Available on Starter and higher — history is never deleted when you switch modes.
Install
Your embed snippet, platform-specific install guides, and the connection checker to verify the widget is live on your store.
Billing
Current plan, usage counters, and plan upgrade. Click Manage subscription to open the Stripe portal — change plan, update payment method, or cancel anytime.
Settings
Manage your domains (sites), change your password, and configure dashboard language.
Plans & Limits
All plans include a free tier to get started. Upgrade when you need more responses, domains, or customization.
| Feature | Free | Starter €15/mo | Growth €39/mo | Pro €79/mo |
|---|---|---|---|---|
| Domains | 1 | 1 | 3 | 10 |
| Responses / month | 50 | 500 | 5,000 | Unlimited |
| All widget modes | ✕ | ✓ | ✓ | ✓ |
| Custom colors & texts | ✕ | ✓ | ✓ | ✓ |
| Response history | ✕ | ✓ | ✓ | ✓ |
| White-label (no branding) | ✕ | ✕ | ✕ | ✓ |
| Priority support | ✕ | ✕ | ✕ | ✓ |
Plans are billed monthly. You can upgrade, downgrade, or cancel at any time from Dashboard → Billing → Manage subscription. No long-term contracts.
FAQ
data-lang attribute, or fully customise every text label from the dashboard on Starter and higher.1. The widget is enabled in Dashboard → Widget.
2. The
data-site value in your snippet matches your Site ID in Dashboard → Install.3. The script tag is placed before
</body>, not in <head>.4. Use the Check connection tool in Dashboard → Install to verify Sidney can reach your site.
5. Open your browser console and add
data-debug="true" to the script tag to see detailed logs.